This guide walks you through the Cravit Gateway admin console: signing in for the first time, setting up two-factor authentication, giving your colleagues access, and controlling what the AI is allowed to do in your Odoo.
Everything in this guide applies to your own organisation only. You cannot see or affect any other Cravit customer.
Before you start, you need two things from Cravit
Your admin console address (for example https://yourcompany.cravitgateway.com/admin/ui), and your one-time admin key, which begins with cga_. Keep the admin key somewhere safe like a password manager. It is shown to you only once and cannot be recovered.
1. Signing in for the first time
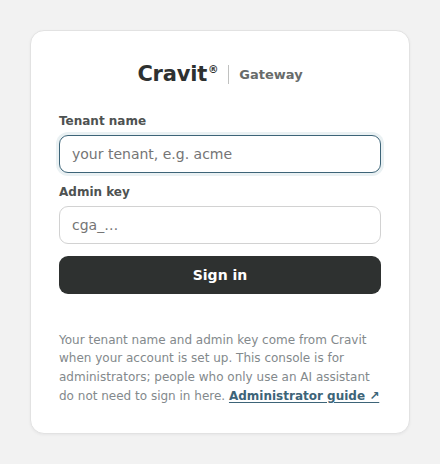
Open the admin console address in your browser. You will see the sign-in screen.
In the first box, enter your tenant name. This is the short code Cravit gave you for your organisation (for example “acme”).
In the second box, paste the admin key that starts with cga_.
Click Sign in.
2. Setting up two-factor authentication
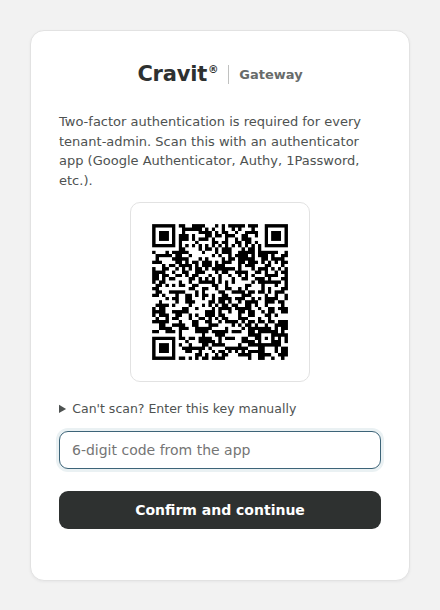
Two-factor authentication is required for every administrator and cannot be skipped. Even if someone else obtained your admin key, they still could not get into your console without your phone.
Open an authenticator app on your phone. Google Authenticator, Microsoft Authenticator, Authy and 1Password all work.
Use the app to scan the QR code on screen. If your phone cannot scan it, click “Can't scan? Enter this key manually” and type the key into the app instead.
Your app will start showing a 6-digit code that changes every 30 seconds. Type the current code into the box and click Confirm and continue.
Keep your authenticator app
From now on you will be asked for a code from this app each time you sign in. If you lose or replace your phone, contact Cravit. We can reset your two-factor setup so you can enrol again with the new device.
3. Finding your way around
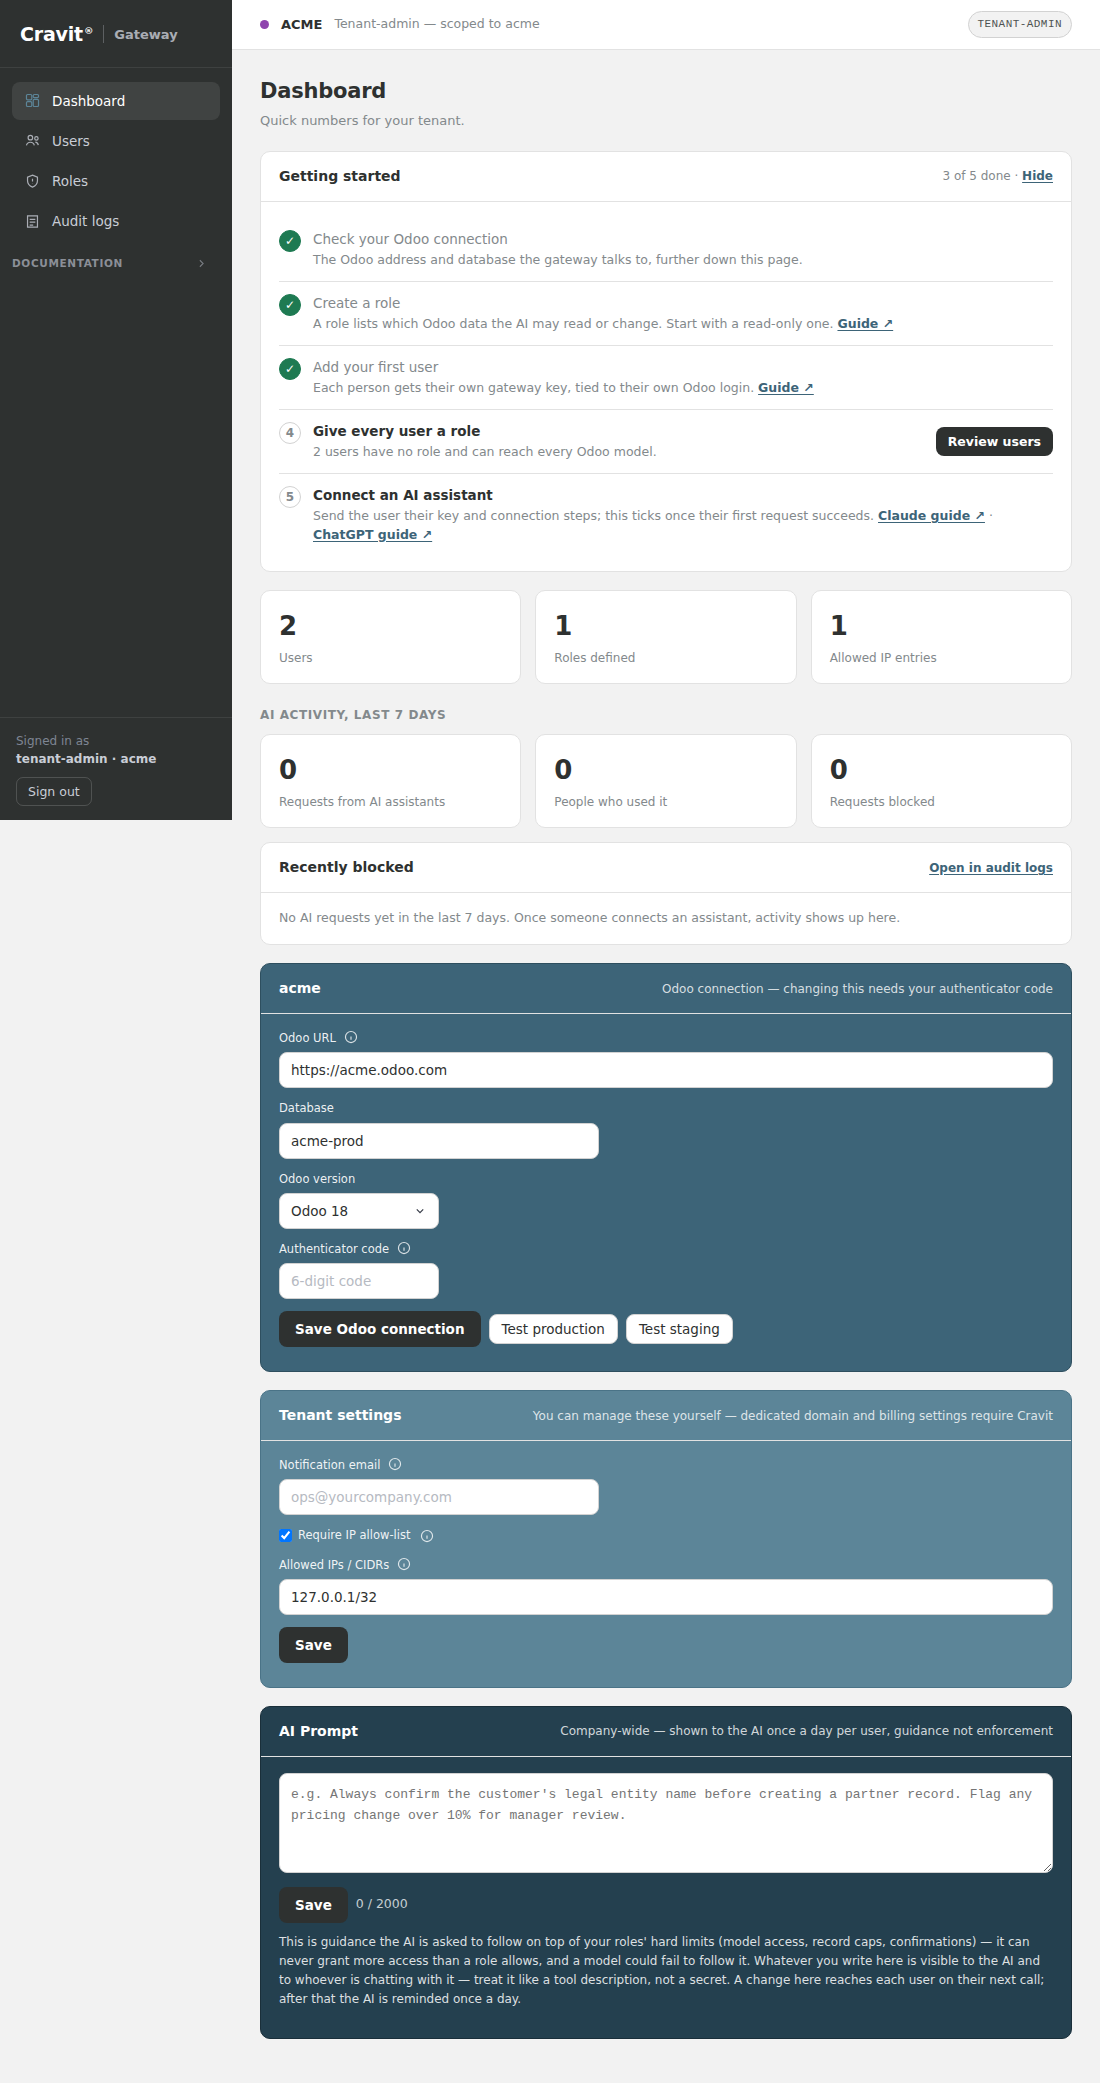
After signing in you land on the Dashboard. While your account is new it opens with a short Getting started checklist that ticks itself off as you complete each step. The menu on the left is your whole console:
Dashboard: an overview of your account, the last seven days of AI activity, and settings you can manage yourself.
Users: the people (and AI assistants) who are allowed to connect.
Roles: rules controlling exactly what the AI may read or change in your Odoo.
Audit logs: a permanent record of every action and every refusal.
4. Giving someone access
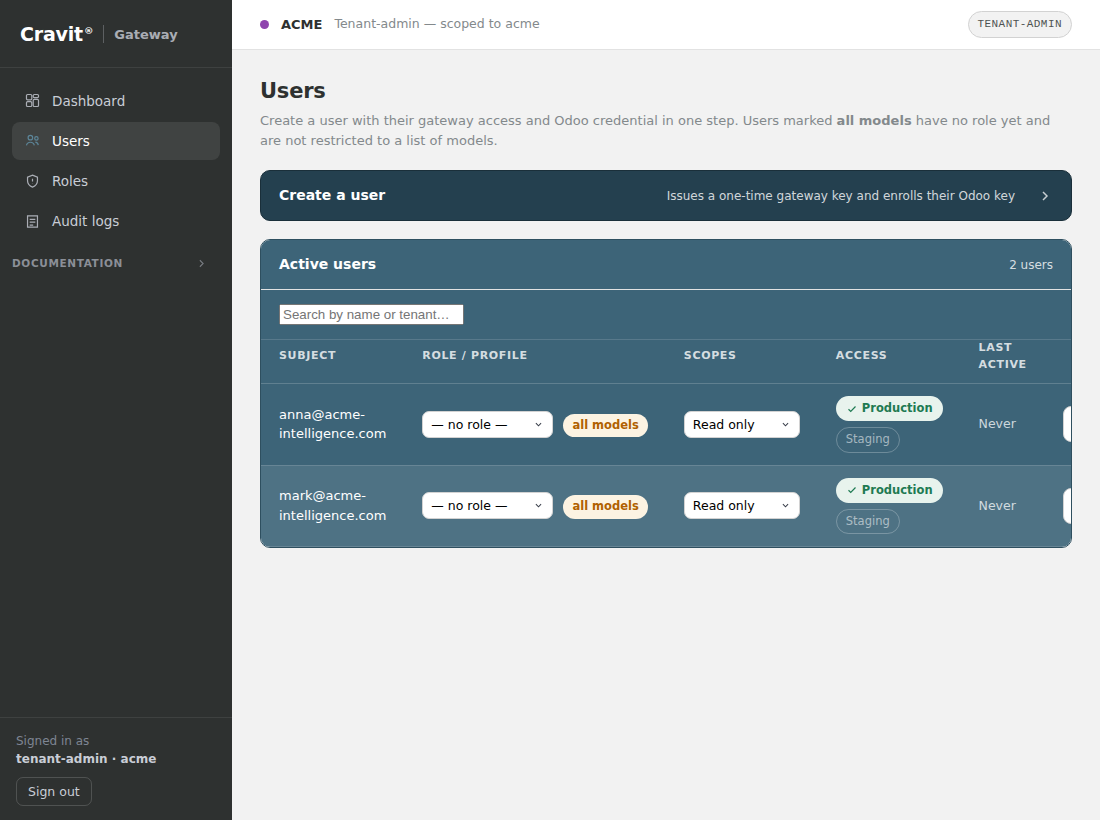
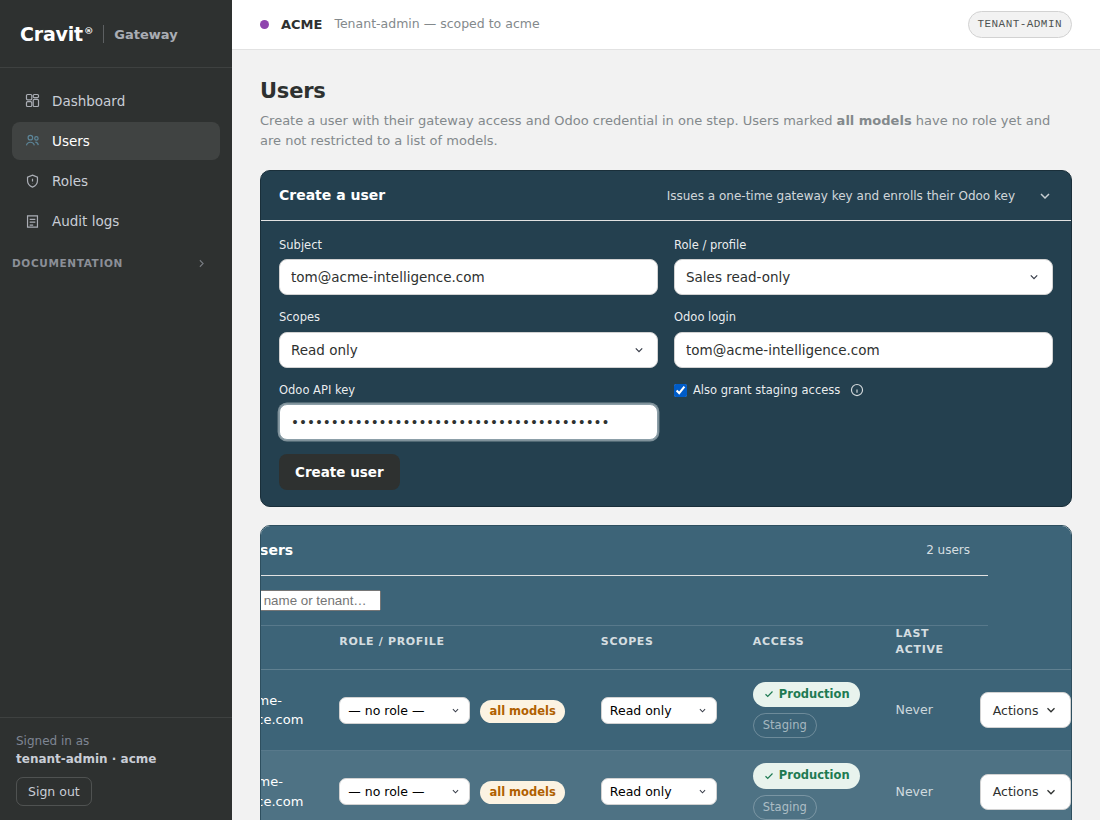
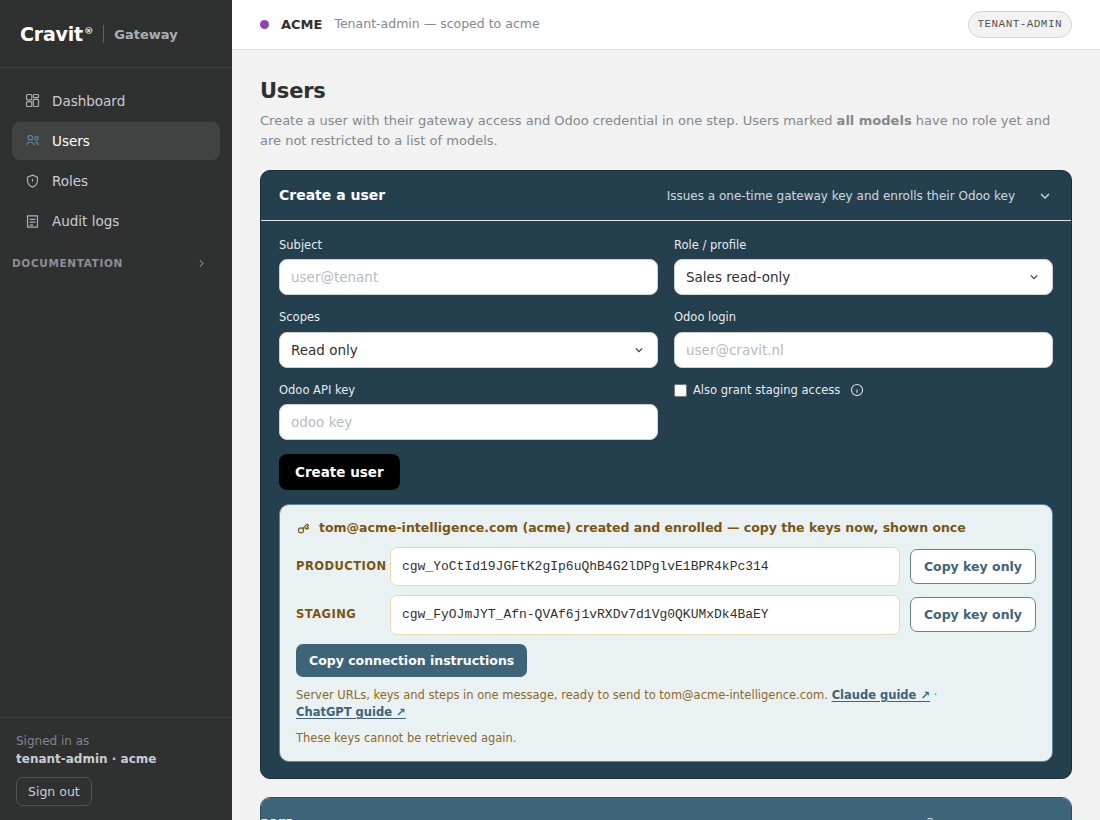
Each person who wants to use AI with your Odoo needs their own gateway key. Go to Users and click the “Create a user” header to open the form.
Subject: a name to identify this person, usually their email address.
Role / profile: which role limits this person (see section 5). A user with no role is marked all models in the list: they are not limited to a list of models, only by Read only / Read + write.
Scopes: choose “Read only” if they should only look at data, or “Read + write” if they also need to make changes.
Odoo login and Odoo API key: that person's own Odoo credentials. This matters: the AI acts inside Odoo as that specific person, so it can never see or do more than they could themselves.
Generating an Odoo API key
Each user creates their own key in Odoo. It takes about a minute:
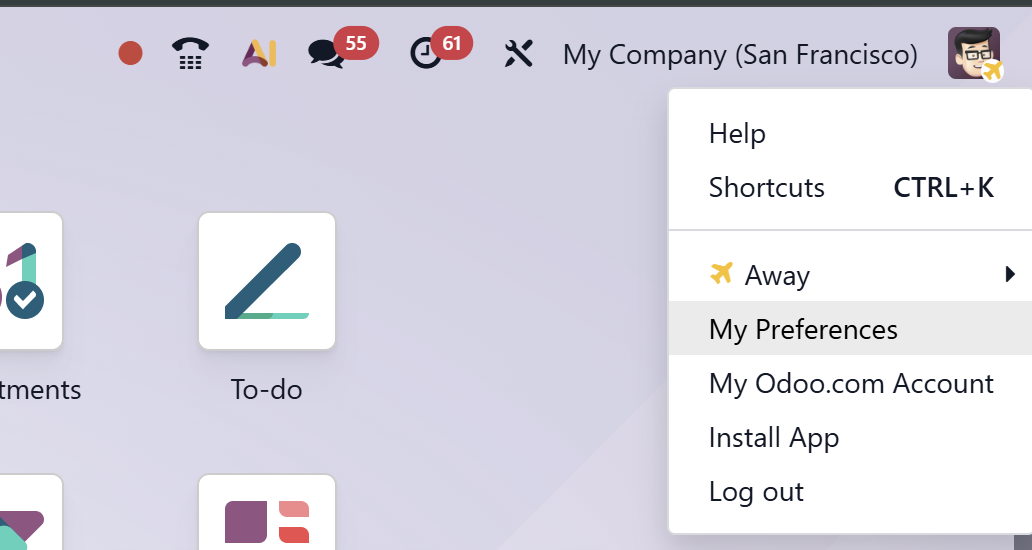
In Odoo, click your name or avatar in the top-right corner and select My Profile (sometimes labelled Preferences).
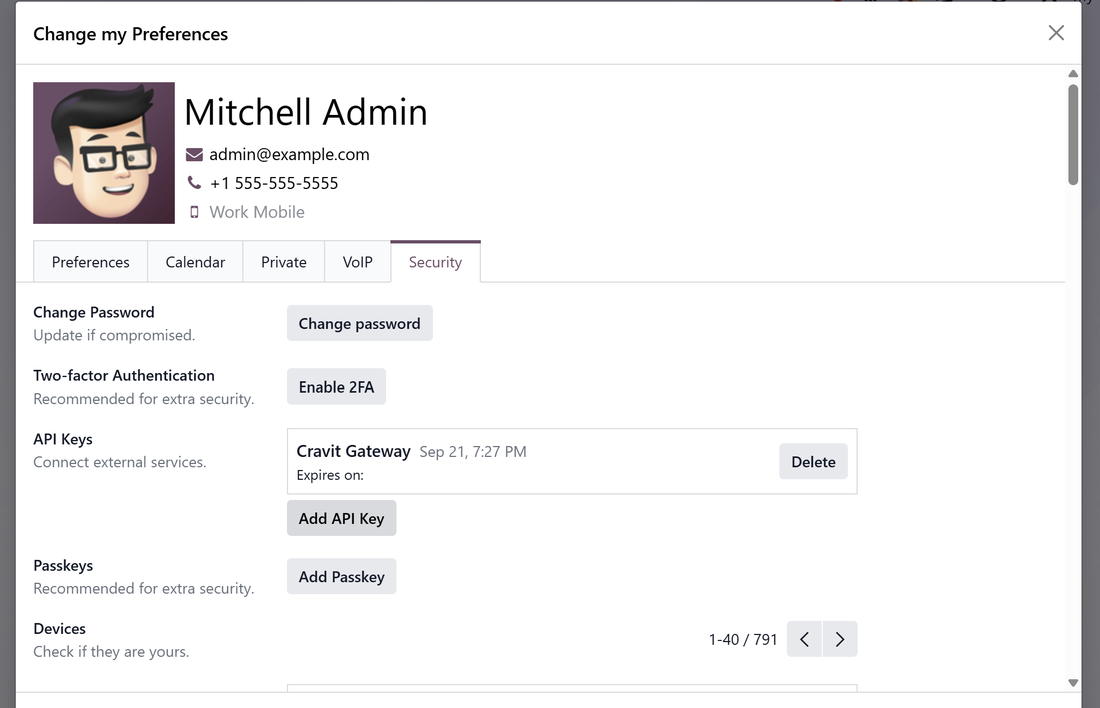
Open the Security tab.
Under API Keys, click Add API Key, then confirm your password when asked.
Enter a clear description such as “Cravit Gateway”. This is the only way to recognise the key later.
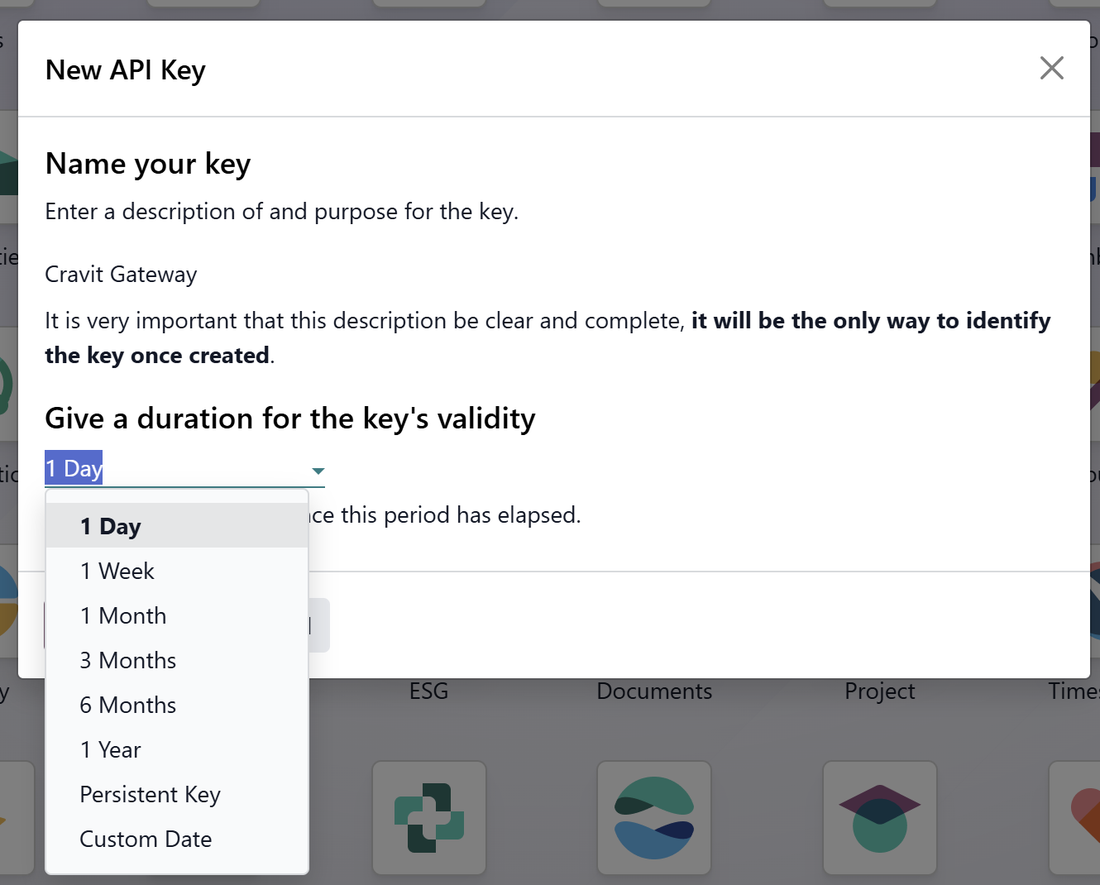
Set the duration. Read the warning below before choosing.
Click Generate Key and copy it immediately. Odoo shows it exactly once, with a note that it provides full access to the account; there is no way to view it again afterwards.
The most common mistake: a key that quietly expires
The duration field defaults to 1 Day. Its dropdown offers 1 Day, 1 Week, 1 Month, 3 Months, 6 Months, 1 Year, Persistent Key, or a Custom Date. Leaving the default in place means the key stops working within 24 hours, breaking the connection until someone generates a new one. Choose Persistent Key for one that never expires, or 1 Year if your organisation prefers a bounded lifetime. A key's duration cannot be changed after creation. If one is set too short, delete it and generate a fresh one.
Don't see Security or Add API Key?
On a hosted Odoo plan, API keys are sometimes only available on higher-tier plans. If this option is missing, that person's Odoo plan is the likely reason. Check with whoever manages that Odoo subscription.
When you click Create user, their gateway key appears once. Copy connection instructions puts the server address, the key and the connection steps into one message you can paste into an email or chat to that person.
Copy the key immediately
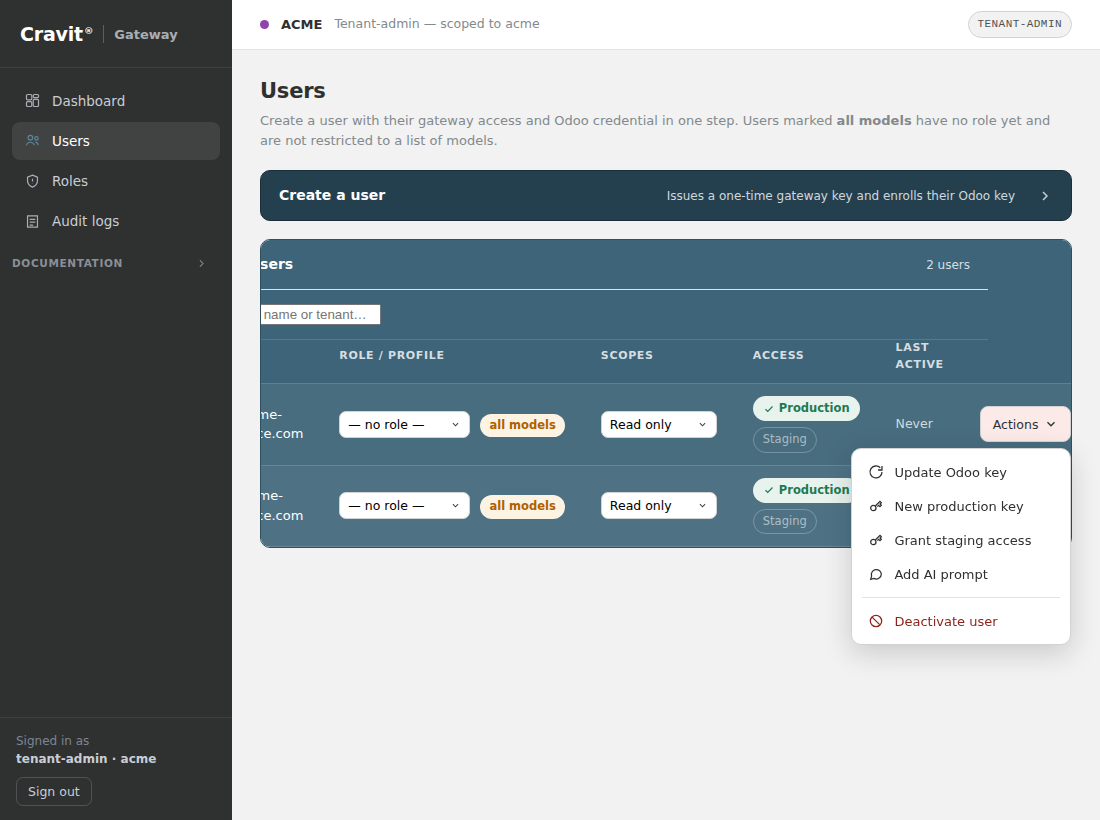
The gateway key (starting cgw_) is shown only once and cannot be retrieved later. Copy it and send it to the person securely. If it is lost, you can issue a fresh one with New production key (or New staging key) in the Actions menu on their row.
Everyone you have added appears in the Active users list. The Actions menu on each row lets you update their Odoo key, issue a new gateway key, grant or revoke staging access, add a personal instruction for the AI, or deactivate them (which keeps their record and can be undone). The Access column shows which environments each person holds a key for.
Staging and production (optional)
If Cravit has configured a staging copy of your Odoo as well as production, you can give people access to either or both. The rule is simple: one key per environment, and each key only works on its own connector.
A person's normal key reaches production. Tick Also grant staging access when creating them, or choose Grant staging access from their Actions menu later, and they receive a second key for staging. Both keys appear in the hand-off message with their own server address (the staging one ends in /staging/mcp).
In their assistant the person adds staging as a separate connector, so they can always see which one they are talking to. A production key pasted into the staging connector (or the other way round) is refused with a message saying which address to use instead.
The second key is tied to the same user: the same role, scopes and instructions apply, and deactivating the person switches off both keys. You can revoke the staging key on its own at any time.
The AI is told which environment it is working in on every answer, and on staging it says so at the start of a conversation. Changes still need confirmation on staging, exactly as on production, so nobody learns a different habit on the test system.
If staging is a fresh copy of production (for example after an Odoo.sh rebuild), the person's production Odoo API key usually still works there. Copy production Odoo key to staging in the Actions menu saves re-entering it; the row is marked until a separate staging key is enrolled.
On the Dashboard, Test production and Test staging check that each Odoo answers, that the configured database still exists and that the connection credential works. After an Odoo.sh rebuild, run it before telling people staging is ready.
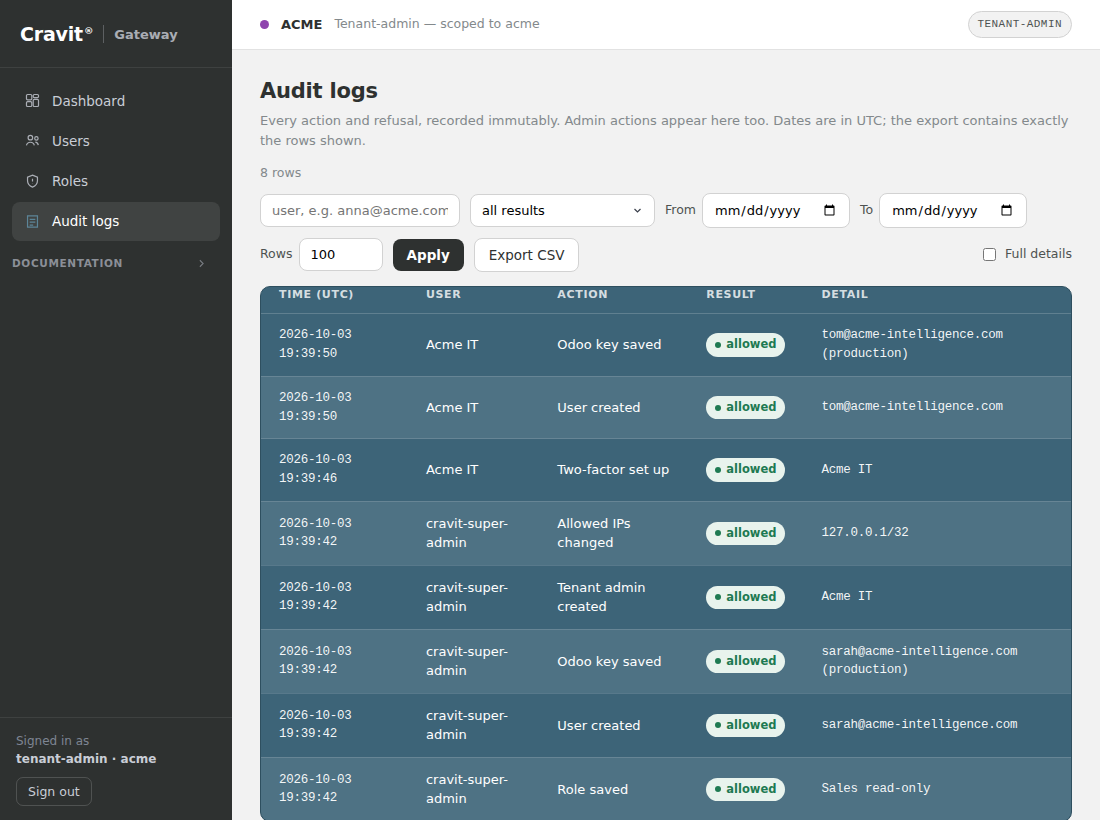
The Audit logs page has an environment filter, so you can look at staging and production activity separately.
5. Controlling what the AI can do
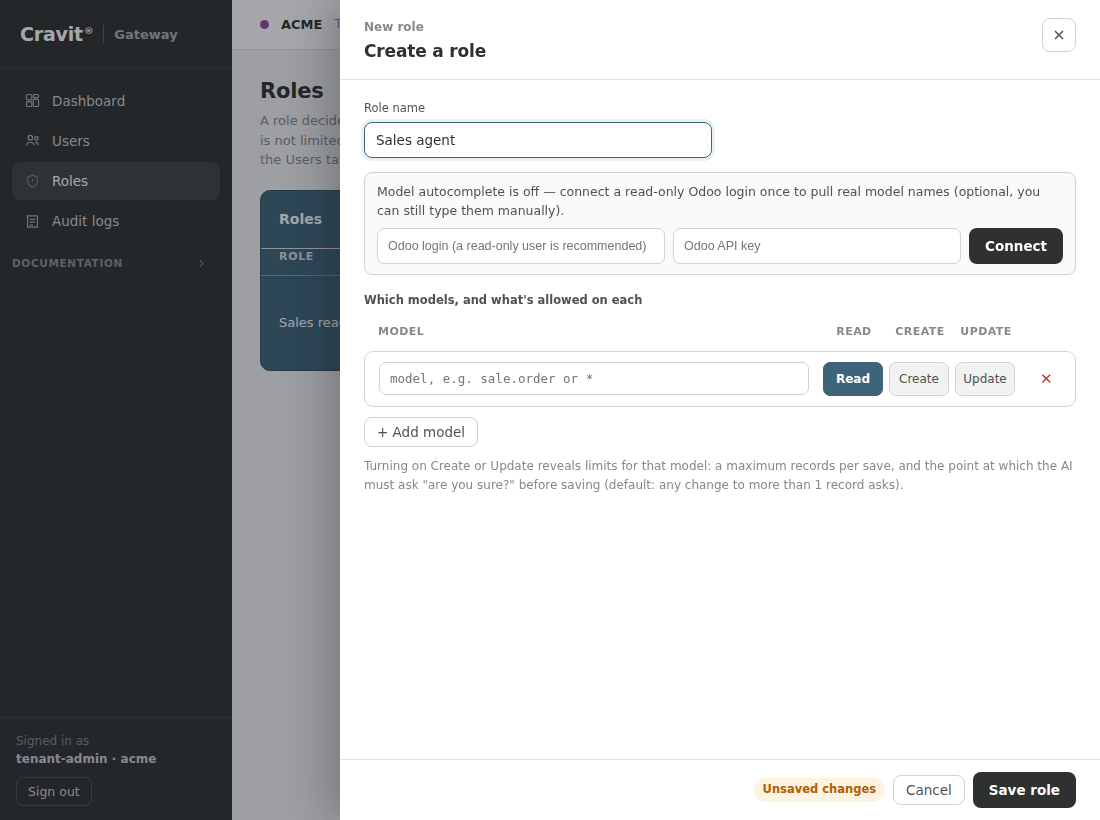
Roles are how you limit the AI. A role is a list of exactly what is allowed. Anything not on the list is automatically refused. Click + Create role to open the role editor beside the list; to change an existing role, click Edit on its row. The editor warns you if you move on with unsaved changes.
Give the role a clear name, such as “Sales read-only”.
Add the Odoo records it may touch (for example sale.order or res.partner), and tick Read, Create or Update for each one.
Save the role, then assign it to a person from the Users page.
Safe by default
If you turn on Create or Update, you can also set a limit on how many records may change at once, and the point at which the AI must stop and ask you before saving. By default, any change affecting more than one record requires confirmation.
6. Checking what happened
Audit logs record every request, whether it was allowed or refused, and who made it. Nothing can be edited or deleted from this record.
Use the filters at the top to narrow by user, result and date range (dates are in UTC), tick Full details to see the exact records involved, and use Export CSV to download the rows shown. A “pending confirmation” entry is not a rejection. It means the AI paused to ask before making a bulk change.
7. Settings you can change yourself
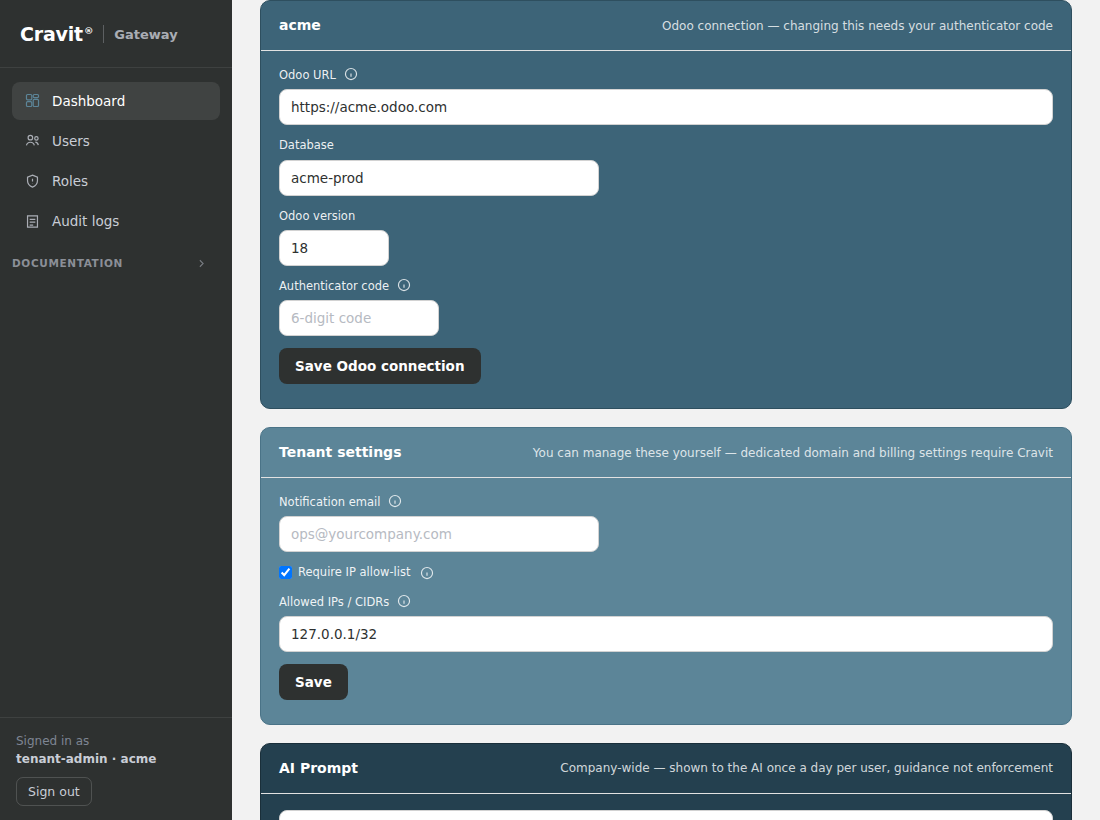
Back on the Dashboard you will find settings you can manage without contacting Cravit:
Odoo connection: the Odoo address, database name and version the gateway connects to. Because changing this affects where your users' credentials are sent, you must enter a current code from your authenticator app to save it.
Notification email: where notices about changes to your account are sent.
Require IP allow-list: when on, administrators can only sign in from the network addresses you list. Turn it off if your office has no fixed IP address; two-factor authentication still protects the console either way.
AI Prompt: company-wide guidance shown to the AI once a day per user, and again as soon as you change it. Useful for house rules, though it is guidance rather than enforcement. Use Roles for anything that must be enforced.
Need something not listed here?
Billing settings, your dedicated portal domain, and creating additional administrators are handled by Cravit. Contact us and we will take care of it.
8. Signing in from now on
On later visits, after entering your tenant name and admin key you will simply be asked for the current 6-digit code from your authenticator app. You will not need to set up the app again.
Your session stays active if you refresh the page, and ends when you close your browser or click Sign out.
Connect an assistant
Using Cravit Gateway with Claude
This guide explains how to connect your Cravit Gateway account to Claude, so that Claude can read and, where you allow it, update records in your Odoo. Claude always acts as you, within the access your administrator has set up.
Which Claude plan do you need?
Custom connectors work on every Claude plan, including Free. What differs is who can add one. On Team and Enterprise, an Owner or Primary Owner must add the connector for the whole organisation first (step 1 below); individual members can only connect to one that is already there. On Pro or Max, there is no organisation step: skip straight to “Connecting your own account”.
Before you start, you need
Your own Cravit gateway key (starts with cgw_; ask your administrator if you don't have one yet; they will need your Odoo API key to create it), and your gateway's MCP address, which your administrator can give you (for example https://yourcompany.cravitgateway.com/mcp).
What connecting Claude actually does
Once connected, Claude can call a small set of tools against your Odoo, entirely through the Cravit Gateway:
Search and read records you have access to.
Create or update records, only if your administrator has given your account write access.
Claude never sees your Odoo password or API key. It only ever acts through your gateway key, which enforces exactly the access your administrator configured for you. If your role only allows reading, Claude cannot write, no matter what it is asked to do.
Bulk changes pause for your confirmation
If a request would change more than a small number of records at once, Claude will stop and ask before saving. Your administrator can adjust that threshold per role.
1. One-time setup for your organisation
This step is done once for your whole Claude organisation, by whoever manages it (a Claude Owner or Admin). If someone has already done this for your team, skip to step 2.
In Claude, go to Organization settings, then Connectors.
Click Add custom connector, then choose Web.
Give it a name (for example “Cravit Gateway”) and paste your gateway's MCP address.
Leave the OAuth Client ID and Client Secret fields under Advanced settings empty. The gateway registers itself with Claude automatically the first time someone connects.
Click Add. The connector now appears for everyone in the organisation. Each person still connects individually with their own key in the next step.
2. Connecting your own account
Everyone who wants to use Claude with Odoo does this step individually, using their own gateway key. Your key is personal. Do not share it with a colleague; ask your administrator to create their own instead.
In Claude, go to Settings, then Connectors.
Find Cravit Gateway in the list and click Connect.
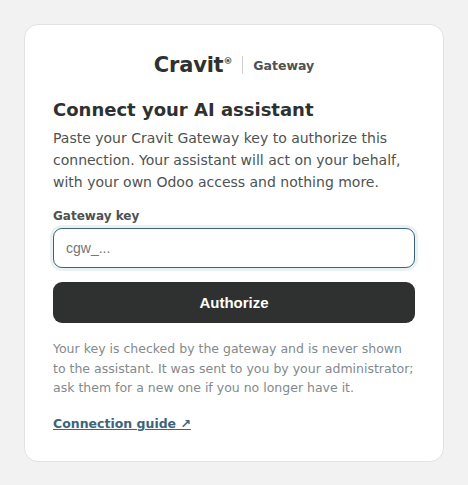
A page opens asking for your gateway key. Paste the key that starts with cgw_.
Click Authorize. You'll be returned to Claude, now connected.
Your key stays with the gateway
Your key is checked by the Cravit Gateway itself and is never shown to or stored by Claude. Claude only receives a token that works through the gateway. It cannot read the key back out.
3. Using it in a conversation
Custom connectors are enabled per conversation, not permanently on:
Start a new chat in Claude.
Click the + button near the message box, then Connectors.
Turn on Cravit Gateway for this conversation.
Ask Claude what you need.
A few starting prompts:
“Look up the contact details for [company name] in Odoo.”
“List my open opportunities closing this month.”
“Update the phone number on this contact to [number].” (only if your role allows writing)
If something doesn't work
Claude can't connect, or the key is rejected. Check you copied the whole key, with no extra spaces, and that it hasn't been rotated or revoked since you received it.
Claude says a change isn't allowed. That is the access control working as intended. Ask your administrator to review your role if you believe it is incorrect.
The connector doesn't appear in your list. It needs to be added at the organisation level first (step 1); ask whoever manages your Claude organisation.
You're not sure which MCP address or tenant name to use. Your administrator has both; they are the same details used to sign in to the admin console.
Connect an assistant
Using Cravit Gateway with ChatGPT
This guide explains how to connect your Cravit Gateway account to ChatGPT, so that ChatGPT can read and, where you allow it, update records in your Odoo. ChatGPT always acts as you, within the access your administrator has set up.
Which ChatGPT plan do you need?
Custom connectors require a paid plan: Plus, Pro, Business, Enterprise or Edu. They are not available on the Free plan. On Business, Enterprise and Edu workspaces, your workspace admin may also need to switch on custom connectors, or approve this one specifically, before Developer Mode has any effect for your account.
Before you start, you need
Your own Cravit gateway key (starts with cgw_; ask your administrator if you don't have one yet), and your gateway's MCP address (for example https://yourcompany.cravitgateway.com/mcp).
What connecting ChatGPT actually does
Search and read records you have access to.
Create or update records, only if your administrator has given your account write access.
ChatGPT never sees your Odoo password or API key. It only ever acts through your gateway key, which enforces exactly the access your administrator configured for you. Bulk changes pause for your confirmation before anything is saved.
1. Turning on Developer Mode
ChatGPT keeps custom connectors behind a setting called Developer Mode. This is a one-time toggle on your own account.
In ChatGPT, open Settings.
Go to Apps & Connectors, then Advanced settings.
Turn on Developer mode.
ChatGPT shows a warning about unverified connectors. This is standard for any custom connector. Review it and confirm.
2. Adding the connector
With Developer Mode on, add Cravit Gateway as a custom connector. This is done once per person.
In ChatGPT, open Settings, then Apps & Connectors.
Click Create (this may also say Add custom connector, depending on your plan).
Fill in the details:
Name
Cravit Gateway
MCP server URL
https://yourcompany.cravitgateway.com/mcp
Authentication
OAuth
ChatGPT detects OAuth automatically from the gateway, so you don't need a client ID or secret.
Confirm that you understand this is a custom, unverified connector, then click Create.
ChatGPT opens the gateway's sign-in page. Paste the gateway key that starts with cgw_ and click Authorize.
This is the same sign-in page for every AI assistant that connects to the gateway, and it works the same way for each.
Your key stays with the gateway
Your key is checked by the Cravit Gateway itself and is never shown to or stored by ChatGPT. ChatGPT only receives a token that works through the gateway.
3. Using it in a conversation
Start a new chat in ChatGPT.
Open the tools or connector picker in the message box.
Turn on Cravit Gateway for this conversation.
Ask ChatGPT what you need, for example “Find all open sales orders for [customer]”.
If something doesn't work
You don't see Developer Mode, or Create / Add custom connector. You may be on the Free plan (not supported), or your workspace admin needs to enable custom connectors first.
ChatGPT can't connect, or the key is rejected. Check you copied the whole key, with no extra spaces, and that it hasn't been rotated or revoked.
ChatGPT says a change isn't allowed. That is the access control working as intended. Ask your administrator to review your role.
Connect an assistant
Using Cravit Gateway with Microsoft 365 Copilot
This guide explains how your organisation connects Cravit Gateway to Microsoft 365 Copilot, so that Copilot can read and, where allowed, update records in your Odoo.
Connecting Copilot is more involved than connecting Claude or ChatGPT, and requires your Microsoft 365 administrator. This guide is written for that administrator, with a short section at the end for the people who will use it afterwards.
Which Microsoft 365 licences do you need?
Each person who will query Odoo through Copilot needs a Microsoft 365 Copilot add-on licence (or an equivalent plan). The administrator setting up the connector needs the AI administrator role in the Microsoft 365 admin center.
Before you start, your administrator needs
Access to the Microsoft 365 admin center with permission to manage Copilot connectors, your gateway's MCP address (for example https://yourcompany.cravitgateway.com/mcp), and an OAuth app registration for the gateway created in the Teams Developer Portal. Cravit provides the details needed for that registration.
How this differs from Claude and ChatGPT
With Claude and ChatGPT, each person connects their own key inside the AI product. In Microsoft 365, the connector is set up once by IT, and the OAuth app registration lets Microsoft's platform hand each person's own sign-in through to the gateway. People still each need their own Cravit gateway key; they are just not the ones adding the connector.
Copilot never sees anyone's Odoo password or API key, and only ever acts through each person's gateway key and role.
1. One-time setup (IT administrator)
Microsoft offers two places to add an MCP connector: Copilot Studio, for organisations building a custom agent, and Microsoft 365 Copilot connectors, for the everyday Copilot chat. This guide covers the second, more common case.
In the Microsoft 365 admin center, go to Copilot, then Connectors.
Open the Gallery tab, and under “Created by your org” select Create a new connector.
Choose Connect to MCP server.
Enter the gateway's MCP address.
Microsoft requires an OAuth registration ID at this point, matching an app you register beforehand in the Teams Developer Portal. Contact Cravit for the exact redirect URL and endpoint details your registration needs.
Save the connector, then roll it out to the users or groups who should have it.
Ask Cravit for help with this step
Microsoft's process for adding a custom MCP connector has been changing, and the OAuth app registration is fiddly. Rather than working from this page alone, ask Cravit to walk your IT administrator through the current process. We will confirm what your tenant supports before you spend time on it.
2. For people using it
In Microsoft 365 Copilot, find Cravit Gateway among your available connectors (typically the Connectors panel in Copilot or in Teams).
Choose to connect it, and you'll be sent to the gateway's sign-in page.
Paste your own Cravit gateway key, the one starting cgw_, and click Authorize.
This is the same sign-in page for every AI assistant that connects to the gateway, and it works the same way for each.
Ask Copilot what you need, for example “Find all open sales orders for [customer]”.
If something doesn't work
You can't find the connector. It needs to be added and rolled out by your administrator first.
The sign-in step fails, or loops back without connecting. This usually points to the OAuth app registration, not your own key. Pass it to your administrator; it needs to be fixed centrally.
Copilot says a change isn't allowed. That is the access control working as intended. Ask your administrator to review your role in Cravit.
Support
Getting help
If you are locked out, have lost your admin key, need something changed that isn't in these guides, or run into trouble connecting an AI assistant, contact Cravit through cravit.nl and we will help. For day-to-day issues like a lost gateway key, contact your own administrator first.